![]()
A video demonstrating all Spectrum levels (and bonus levels) from my 2.5D version of Bounder.
Last post: 2.12 Bounder Without Bounder C64
20 Goto 10
![]()
A video demonstrating all Spectrum levels (and bonus levels) from my 2.5D version of Bounder.
Last post: 2.12 Bounder Without Bounder C64
![]()
A video demonstrating all 10 C64 levels (and bonus levels) from my 2.5D version of Bounder.
Next Post: 2.13 Bounder Without Bounder Spectrum
Last post: 2.11 Enemies, Bonuses & Environmental Spectrum
![]()
Below is a (hopefully) complete list of NPC’s (i.e. everything that’s not a floor tile) used in the Spectrum version of Bounder.
Type: Boxing Glove
Effect: Instant Death
Movement Type: Vertical (up & down), Down
Levels (no. in level): 2(1) 6(1)
Type: BearTrap
Effect: Instant Death
Movement Type: Static, Horizontal (left to right)
Levels (no. in level): 3(1) 4(3) 5(2) 6(3) 9(2) 10(4)
Type: Binary
Effect: Instant Death
Movement Type: Vertical (up & down)
Levels (no. in level): 5(1)
Type: Binoculars
Effect: Instant Death
Movement Type: Horizontal (left to right), Vertical (up & down)
Levels (no. in level): 1(3) 2(8) 4(2) 5(3) 6(8) 8(2) 9(1) 10(5)
Type: Bird (Crow?)
Effect: Instant Death
Movement Type: Angled (DownDownLeft, Down, DownDownRight, Chase Player)
Levels (no. in level): 1(2) 2(1) 3(1) 4(2) 6(5) 7(2) 10(4)
Type: Blade
Effect: Instant Death
Movement Type: Horizontal (left to right), Chase player
Levels (no. in level): 11(1) 2(1) 4(2) 5(4) 6(2) 7(2) 10(1)
Type: Coin (Type 1)
Effect: Instant Death
Movement Type: Down, Horizontal (left to right)
Levels (no. in level): 3(4) 6(5) 9(1)
Type: Coin (Type 2)
Effect: Instant Death
Movement Type: Horizontal (left to right), Vertical (up & down)
Levels (no. in level): 3(2) 4(1) 5(3) 6(3) 8(2)
Type: Dart
Effect: Instant Death
Movement Type: Left, Right
Levels (no. in level): 1(1) 2(1) 3(2) 4(1) 5(2) 6(1) 8(4) 10(2)
Type: Dust Cloud
Effect: Instant Death
Movement Type: Horizontal (left to right), Vertical (up & down)
Levels (no. in level): 2(2) 5(1) 10(1)
Type: Electricity Generator
Effect: No Damage
Movement Type: Static
Levels (no. in level): 2(1)
Type: Fireball
Effect: Launched form Volcanoes & Plant-Pots (Exploding) – Instant Death
Movement Type: Angled (random angle set a launch)
Levels (no. in level): 2(1) 5(1) 8(1)
Type: Gremlin
Effect: Instant Death
Movement Type: Static, Horizontal (left to right), Vertical (up & down) & angled (Down-left)
Levels (no. in level): 3(3) 4(3) 6(4) 7(5) 9(2) 10(3)
Type: Mouth
Effect: Instant Death
Movement Type: Static, Horizontal (left to right)
Levels (no. in level): 6(1) 9(1) 10(1)
Type: Robot (Moving)
Effect: Instant Death
Movement Type: Horizontal (left to right), Vertical (up & down), Down
Levels (no. in level): 2(3) 4(1) 6(1) 9(1) 10(1)
Type: Robot (Exploding)
Effect: Instant Death
Movement Type: static, explodes launching fireballs once it has scrolled a third of the way down the screen
Levels (no. in level): 4(1) 6(1)
Type: Spinning Wheel
Effect: Instant Death
Movement Type: Horizontal (left to right), Vertical (up & down), Down
Levels (no. in level): 3(3) 4(3) 5(2) 6(6) 9(3) 10(3)
Type: Sea Missile
Effect: Instant Death
Movement Type: down
Levels (no. in level): 3(4) 4(2) 5(12) 6(16) 9(1) 10(6)
Type: Volcano
Effect: Instant Death
Movement Type: static, explodes once it has scrolled a third of the way down the screen
Levels (no. in level): 2(1) 5(1) 8(1)
Type: Basketball
Effect: 20 Jumps
Movement Type: Horizontal (left to right)
Levels (no. in level): 6(1)
Type: Copyright
Effect: 10000 points
Movement Type: Horizontal (left to right)
Levels (no. in level): 6(1)
Type: Boxing Glove
Effect: Appears once the player reaches the end of a (non-bonus) level – Player has 6 bounces to reach the exit – otherwise they are ‘punched’ towards the exit
Movement Type: Vertical (up & down)
Levels (no. in level): 1(1) 2(1) 3(1) 4(1) 5(1) 6(1) 7(1) 8(1) 9(1) 10(1)
Type: Fan
Effect: pushes player left-right (depending on direction fan is facing)
Movement Type: static
Levels (no. in level): 4(2) 5(2) 6(2) 8(2)
Type: Jump Gate
Effect: player collides with entrance gate disappears from the game until re-appearing from an exit gate
Movement Type: static
Levels (no. in level): 3(2) 4(2) 5(2) 6(7)
Type: MovingTile
Effect: player can bounce safely on moving tile
Movement Type: Horizontal (left to right)
Levels (no. in level): 3(2) 4(3) 5(3) 6(8) 7(2) 9(2) 10(3)
 |
 |
 |
 |
 |
|---|---|---|---|---|
| Static | Horizontal | Vertical | Left | Right |
 |
 |
 |
 |
 |
| Down | Down Left | DownDown Left | DownDown Right | Down Right |
 |
 |
 |
 |
 |
| Cross | Random | Angled | Chase Player | Explode |
 |
 |
|||
| Fan | Mine |
Next Post: 2.12 Bounder Without Bounder
Last post: 2.10 Enemies, Bonuses & Environmental C64
![]()
Below is a (hopefully) complete list of NPC’s (i.e. everything that’s not a floor tile) used in the C64 version of Bounder.
Type: Bear Trap
Effect: Instant Death
Movement Type: Static
Levels (no. in level): 4(7) 6(4) 7(6) 9(3)
Type: Binoculars
Effect: Instant Death
Movement Type: Horizontal (left to right), Vertical (up & down), Cross
Levels (no. in level): 2(13) 4(16) 5(12) 6(25) 7(33) 8(23) 9(14) 10(17)
Type: Blade
Effect: Instant Death
Movement Type: Horizontal (left to right), rotating (fan), roaming (random movement)
Levels (no. in level): 1(3) 2(3) 3(3) 4(4) 5(1) 6(7) 7(2) 10(4)
Type: Bottle Axe(?)
Effect: Instant Death
Movement Type: Right
Levels (no. in level): 3(4) 4(2) 7(4)
Type: Vampire Coin
Effect: Instant Death
Movement Type: Down
Levels (no. in level): 3(6) 5(11) 6(15) 8(18) 9(8) 10(3)
Type: Dart
Effect: Instant Death
Movement Type: Right
Levels (no. in level): 3(4) 4(8) 9(8)
Type: Electricity
Effect: Player can collide with generators without dying, electricity stops momentarily to let players through
Movement Type: static
Levels (no. in level): 2(1) 5(4) 7(1) 8(1) 10(1)
Type: Fan
Effect: Pushes player left-right (depending on direction fan is facing)
Movement Type: Static
Levels (no. in level): 3(4) 7(5) 8(6) 10(2)
Type: Mine
Effect: Explodes once it has scrolled a third of the way down the screen – launching four mini-mines which travel in diagonal direction until off screen
Movement Type: Static
Levels (no. in level): 1(1) 9(3)
Type: Pterodactyl
Effect: Instant Death
Movement Type: Angled (DownLeft, Down, DownRight)
Levels (no. in level): 1(1) 3(1) 5(1) 6(1) 8(1)
Type: Missile
Effect: Instant Death
Movement Type: Down – Launches above the player – Initial X position is set to the player x position
Levels (no. in level): 1(1) 2(6) 3(4) 4(4) 5(4) 6(14) 7(10) 8(9) 9(9) 10(14)
Type: Sea Missile
Effect: Instant Death
Movement Type: Down
Levels (no. in level): 3(2) 5(4) 6(12)
Type: Volcano
Effect: launches Fireballs
Movement Type: Static
Levels (no. in level): 4(1) 5(1) 6(2) 7(1) 8(1) 9(1)
Type: Fireball
Effect: Instant Death
Movement Type: Angled (random angle set a launch)
Levels (no. in level): 4(1) 5(1) 6(2) 7(1) 8(1) 9(1)
Type: Basketball
Effect: 20 Jumps
Movement Type: Static
Levels (no. in level): 3(1) 4(2) 5(2) 6(1) 7(2) 8(2) 9(2) 10(2)
Type: Bug
Effect: 30000 points
Movement Type: Down
Levels (no. in level): 4(1) 6(2) 8(1) 9(2)
Type: Copyright
Effect: 10000 points
Movement Type: Down
Levels (no. in level): 3(1) 4(1) 5(1) 6(1) 7(1)
Type: Spring Buffer
Effect: Pushes player left/right (depending on direction fan is facing)
Movement Type: Static
Levels (no. in level): 3(3) 8(2)
Type: Jump Gate
Effect: Player collides with entrance gate disappears from the game until re-appearing from an exit gate
Movement Type: Static
Levels (no. in level): 3(2) 4(2) 5(2) 6(4) 7(2) 9(4) 10(2)
Type: Boxing Glove
Effect: Appears once the player reaches the end of a (non-bonus) level – Player has 6 bounces to reach the exit – otherwise they are ‘punched’ towards the exit
Movement Type: Vertical (up & down)
Levels (no. in level): all(1)
| |
|
|
|
|
|---|---|---|---|---|
| Static | Horizontal | Vertical | Left | Right |
| |
|
|
|
|
| Down | Down Left | DownDown Left | DownDown Right | Down Right |
| |
|
|
|
|
| Cross | Random | Angled | Chase Player | Explode |
| |
|
|||
| Fan | Mine |
Next Post: 2.11 Enemies, Bonuses & Environmental Spectrum
Last post: 2.9 Tileset Spectrum
![]()
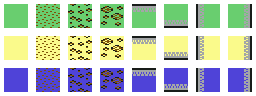
Below is a (hopefully) complete list of tiles used in the Spectrum version of Bounder.
Both foreground & background (floor) tiles are included.
I’ve presented all the tiles in Black and White – However, in game their colours are defined by the current level.
From levels 1-10 (left to right) their colours would be;

Note: After level 7 the colours start repeating
Type: Standard Floor Tiles
Levels: All
Effect: Safe tile – player bounces off
Type: Long Jump
Levels: 1 2 3 4 5 6 8 9 10
Effect: Allows the player to jump twice as far
Type: Moving
Levels: 3 4 5 6 7 9 10
Effect: Safe tile – player bounces off
Type: Mystery
Levels: 1 2 4 5 6 7 8 10
Effect: Mystery tiles are activated if the player bounces on them.
They can provide either positive or negative effects.
Each mystery tile has a specific effect assigned to it – It will have the same effect every game.List Of Potential Effects:
2 bonus jumps
5 bonus jumps
10 bonus jumps
15 bonus jumps
20 bonus jumps
25 bonus jumpsminus 10 jumps
1 extra life
2 extra life
3 extra life
4 extra life
10 extra lifeInstant death – dart
Instant death – mouth
Instant death – explodes
Instant death – player shrinks out of game
Instant death – bear trap
Instant death – boxing gloves100 bonus points
500 bonus points
1000 bonus points
10000 bonus points
25000 bonus points
Type: Barrier
Levels: 1 2 3 4 5 6 8 9 10
Effect: Kills the player on contact
Type: Spike
Levels: 1 2 3 4 5 6 9 10
Effect: Kills the player on contact
Type: Wall (Type 1)
Levels: 1 2 3 4 5 6 8 9 10
Effect: Kills the player on contact
Type: Wall (Type 2)
Levels: 2 3 4 5 6 8 10
Effect: Kills the player on contact
Type: Floor
Levels: All
Effect: Kills the player on contact
Next Post: 2.10 Enemies, Bonuses & Environmental C64
Last post: 2.8 Tileset C64
![]()
Below is a (hopefully) complete list of tiles used in the C64 version of Bounder.
Both foreground & background (floor) tiles are included.
Type: Standard Floor Tiles
Levels: All
Effect: Safe tile – player bounces off
Type: Standard Floor Tiles (Corners)
Levels: All
Effect: Safe tile – player bounces off
Type: Mystery
Levels: All
Effect: Mystery tiles are activated if the player bounces on them.They can provide either positive or negative effects.
However, the way mystery tiles are handled on the C64 version of Bounder adds a slight random/strategic element to the game…
Each mystery tile has a specific effect assigned to it – It will have the same effect every game.
When a mystery tile is created, its effect, rather than being attached to the tile, is instead added to a global list.
So – If the current game screen contains three active mystery tiles, the list will contain three effects.
No matter which tile the player bonuses on, the first effect in the list will be applied to the player.
Once the effect has been applied to the player, it is removed from the list – Otherwise, it is removed from the list once the mystery tile scrolls offscreen.
List Of Potential Effects:
1 bonus level jump
2 bonus level jumps
5 bonus level jumps
20 bonus level jumpsMinus 10 bonus level jumps
1 extra life
2 extra livesInstant death – dart
Instant death – mouth
Instant death – player explodes200 bonus points
500 bonus points
1000 bonus points
2000 bonus points
5000 bonus points
7000 bonus points
10000 bonus points
30000 bonus points
50000 bonus points
Type: Long Jump
Levels: All
Effect: Allows the player to jump twice as far
Type: Vanishing
Levels: 5 6
Effect: Disappears just before player collision
Type: Grass
Levels: 1 7 (Green), 10 (Yellow), 6 (Blue)
Effect: Player can safely bounce on basic grass (single colour tile, far left column) – All others kill the player on contact
Type: Lava (Type 1)
Levels: 2 4 9 (Orange), 5 (Blue), 8 (Purple), 10 (Yellow)
Effect: Kills the player on contact
Type: Lava (Type 2)
Levels: 2 4 9 (Orange), 1 (Green), 5 (Blue), 8 (Purple), 10 (Yellow)
Effect: Kills the player on contact
Type: Lava (Type 3)
Levels: 4 9 (Orange), 5 (Blue), 8 (Purple), 10 (Yellow)
Effect: Kills the player on contact
Type: Mud (Type 1)
Levels: All
Effect: Kills the player on contact
Type: Mud (Type 2)
Levels: 3 5 6 7 8 9 10
Effect: Kills the player on contact
Type: Water
Levels: 3 5 6
Effect: Kills the player on contact
Type: QuickSand (Water Yellow)
Levels: 10
Effect: Kills the player on contact
Type: Floor
Levels: All – 1 7 (Green), 2 4 9 (Orange), 3 5 6 (Blue), 8 (Purple), 10 (Yellow)
Effect: Kills the player on contact
Next Post: 2.9 Tileset Spectrum
Last post: 2.7 Mesh Fade
![]()
Fading a model out of the game can be a pretty useful technique.
When using the built-in shaders, fading a single mesh model in/out is a pretty straight forward process.
If you have model made up of multiple meshes – there is a couple of extra steps you may need to get the desired effect.
I’m going to try and cover both situations below;
For this example, I’m using Unity’s built-in ‘standard’ shader.
The standard shader provides two rendering modes that can be used to fade a mesh – Transparent & Fade.
The unity guide explains their intended usage;
Transparent – Suitable for rendering realistic transparent materials such as clear plastic or glass. In this mode, the material itself will take on transparency values (based on the texture’s alpha channel and the alpha of the tint colour), however reflections and lighting highlights will remain visible at full clarity as is the case with real transparent materials.
Fade – Allows the transparency values to entirely fade an object out, including any specular highlights or reflections it may have. This mode is useful if you want to animate an object fading in or out. It is not suitable for rendering realistic transparent materials such as clear plastic or glass because the reflections and highlights will also be faded out.
Though it’s generally best to try out both options and see which works best for your project.
To fade in/out a single mesh model;
Models use a material to manage their texture, each material has an assoiated colour.
To fade the mesh we change of the alpha value of this colour.
Alpha values are between 0 & 1;
0.0 = completely transparent
0.x = faded to some degree.
1.0 = fully opaque
To fade a mesh out by 50% (In a script attached to the model’s prefab);
Renderer renderer = GetComponent();
Color color = renderer.material.color;
color.a = 0.5f;
renderer.material.color = color;
to fade a specific colour in the material, use the SetColor function;
Renderer renderer = GetComponent();
Color color = renderer.material.color;
color.a = 0.5f;
renderer.material.SetColor("_Color", color);


To fade in/out a multi-mesh mesh model;
If the model has multiple meshes, we need to reference the material(s) for each mesh.
(It can be useful to create an instance of each material.
That way the alpha change will only effect that instance of the model & not every model that uses the material)
We may also need to manually set the models ZWrite value
The ZWrite value determines the order in which each mesh is drawn to screen.

To put this in code (as a script attached to the models prefab);
First create a global variable to hold the renderer for each mesh;
Renderer[] rendererObjects;
Then in the init or start method, the renderer array is initialised & populated,
the ZWrite value (draw order) is defined (rather simply here)
 for (int counter = 0; counter < rendererObjects.Length; counter++)
 {
   Material material = rendererObjects[counter].material;
   material.SetInt("_ZWrite", counter);
 }
Once thats done & we are ready to fade – In the main code we can fade the model in or out (in this example I fade the model out – then destroy the instance once it is completely transparent);
for (int counter = 0; counter < rendererObjects.Length; counter++)
 {

   Color color = rendererObjects[counter].material.color;
   color.a -= (Time.deltaTime / 1f) % 1.0f;

   if (color.a <= 0)
      Destroy(gameObject);

   else
      rendererObjects[counter].material.SetColor("_Color", color);

}
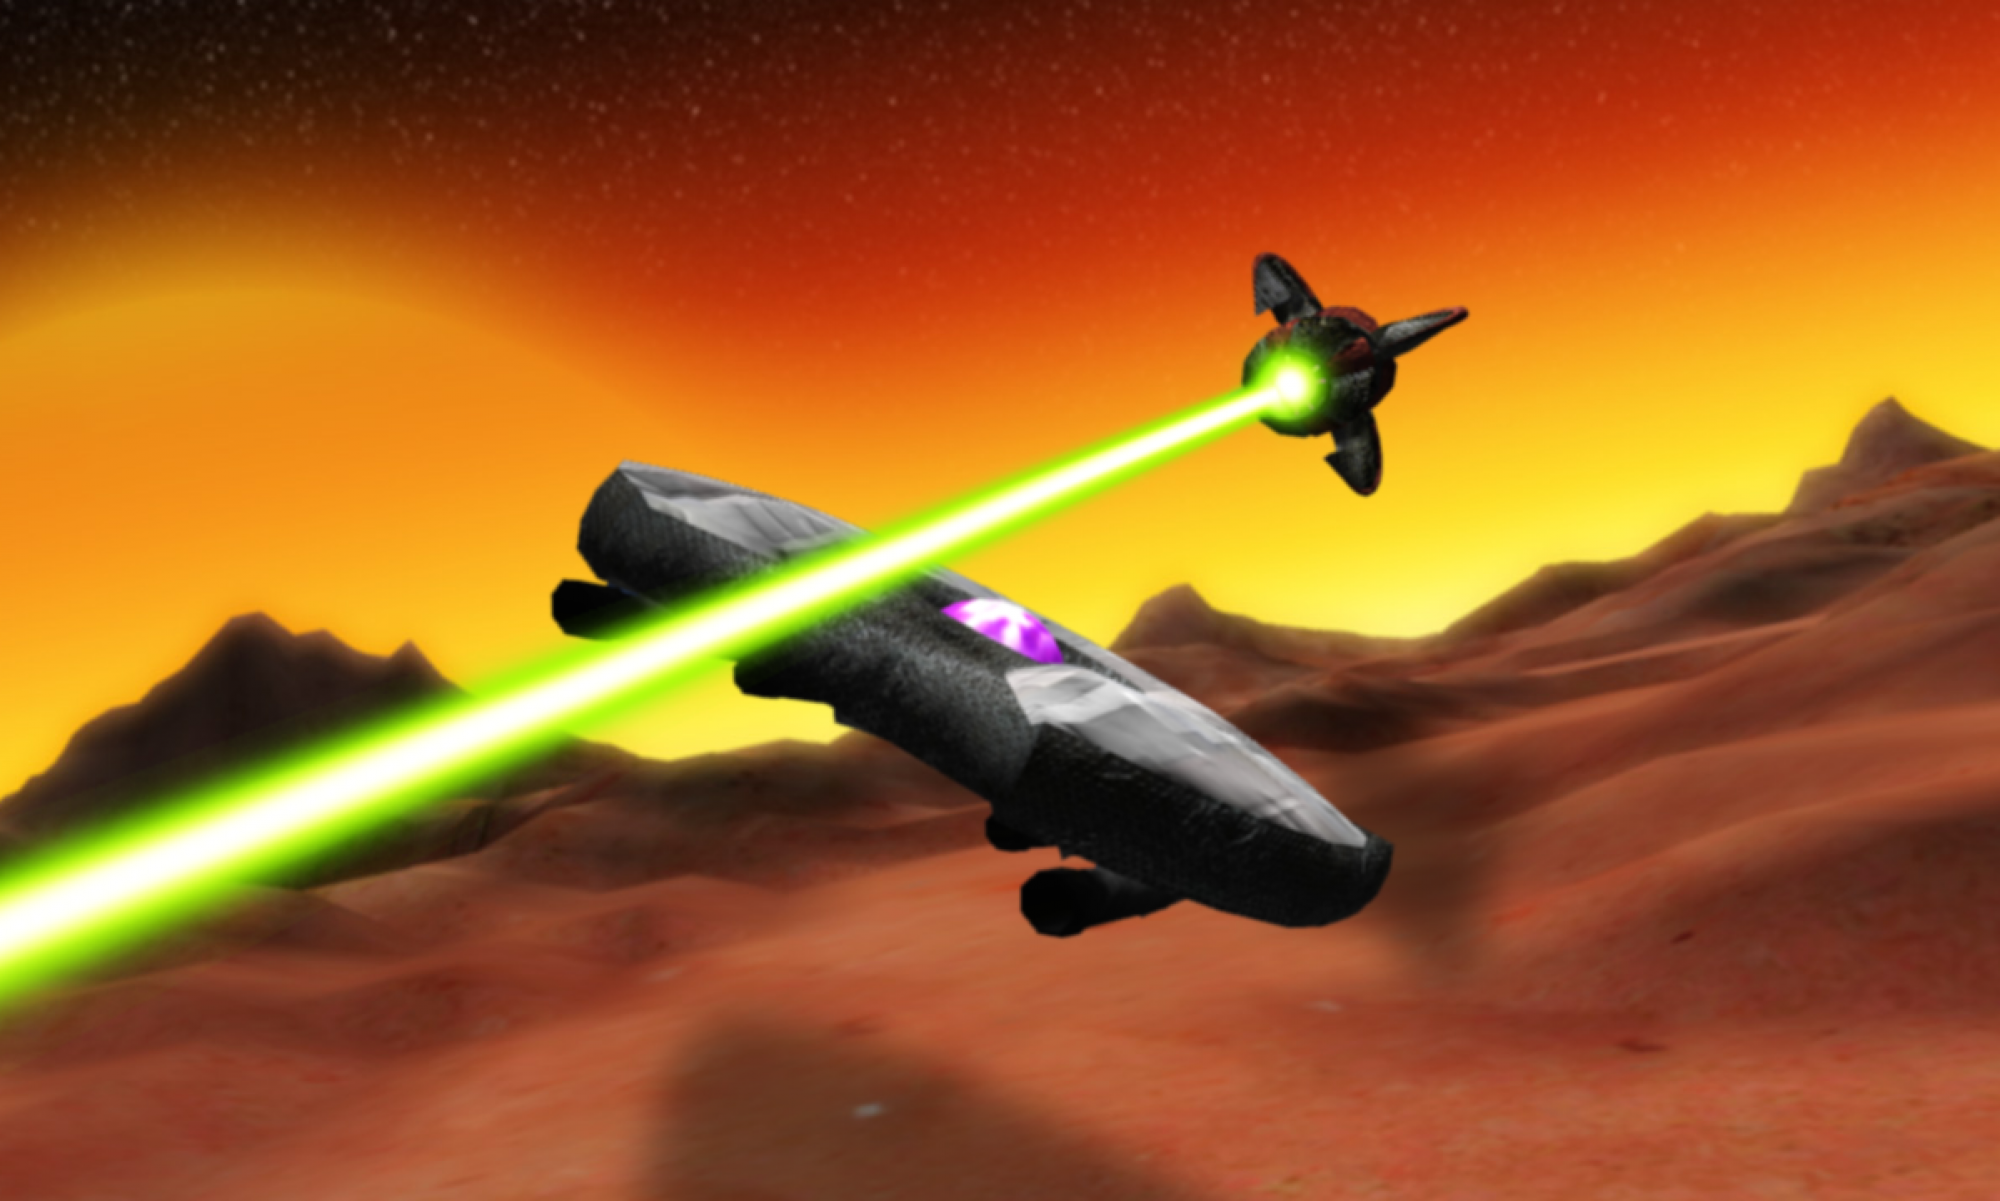
The final result should look something like this;


Next Post: 2.8 Tileset C64
Last post: 2.6 Pause & Resume
![]()
Whenever a bonus is collected a message box is displayed and the game pauses momentarily.
It’s not a function of the game I particularly like; and I probably wouldn’t use it in the final release – But, since the point of this project is to try things out & help me learn Unity, I figured I’d try and replicate it anyway.

When displaying the message box, the entire game should pause – including problematic functions like particles/physics/etc.. things controlled by the Unity engine.
Google found me a solution pretty quickly – Time.timeScale
To freeze the game set Time.timeScale = 0 – To resume the game set Time.timeScale = 1.
Time.timeScale is a float variable.
Every loop, Unity multiplies Time.deltaTime against Time.timeScale.
This determines the speed of the game – For anything that references Time.deltaTime – Any update that doesn’t reference Time.deltaTime will be unaffected (Though you really should be using Time.deltaTime).
It’s usually used to pause games & tends to be set with values 0 or 1.
Though it can be used to dynamically slow/speed up gameplay – values higher than 1 may legally require that yakety sax be played at all times.
With everything paused; the next problem was how to animate the message box – (fade in, display for x seconds, fade out).
I can run the animation without using Time.DeltaTime – But then I won’t receive any of the benefits.
Another quick google search identified the solution – A homebrew Time.deltaTime using replacement using Time.realtimeSinceStartup.
Unity documentation explains ‘realtimeSinceStartup returns the time since startup, not affected by Time.timeScale. realtimeSinceStartup also keeps increasing while the player is paused (in the background). Using realtimeSinceStartup is useful when you want to pause the game by setting Time.timeScale to zero, but still want to be able to measure time somehow.‘
I use The replacement Time.deltaTime as a timer;
  IEnumerator PauseTimer(float delay)
  {

     float start = Time.realtimeSinceStartup;
     timerComplete = false;

     while (Time.realtimeSinceStartup < start + delay)
     {
          yield return null;
     }

     timerComplete = true;

}

Next Post: 2.7 Mesh Fade
Last post: 2.5b Palette Shift
![]()
For the C64 version of Bounder, the text colour of the start and end tiles bounces between black and white.


I wanted to replicate this in my version – But I wasn’t sure how.
I eventually worked through six potential implementations;
The first three implementations, were covered in the last post.
This post will expand on the second half;
4. Quad Cut-Out
This method uses two textures – One ‘base’ texture displays the standard start/goal tile texture – The other ‘top’ texture; is a copy of the top face of the tile texture; the face showing the start/goal banner image & text – with everything except the letters (start & goal) removed (transparent instead).

The base texture is used to draw the tile model. The top texture is applied to a quad – a child of the tile – which is positioned just over the top of the base tile.
The colour lerp code is then applied to the the top texture – ensuring only the text changes colour while the background remains the same.
How this works…
First a quad (this will be created locally) and a material holding the quads texture (this will be passed as a reference in the Unity editor) are defined as global variables;
GameObject quad;
public Material material1;
In start, the quad is created & configured.
if (type == Type.Enter || type == Type.Exit)
{

     quad = GameObject.CreatePrimitive(PrimitiveType.Quad);
     rend = quad.GetComponent();
     rend.material = material1;
     quad.transform.parent = transform;

      quad.transform.Rotate(90, 0, 0);

}
Since this method uses the colour lerp code, we need somewhere to hold the current colour.
public Color lerpedColor = Color.white;
Then every loop, the position of the quad is updated (to keep up with the tile as it scrolls down the screen). The next colour for the banner flash is calculated and assigned to the quads texture.
quad.transform.position = new Vector3(transform.position.x, transform.position.y + 0.275f, transform.position.z);
lerpedColor = Color.Lerp(Color.white, Color.black, Mathf.PingPong(Time.time, 1));
quad.GetComponent().material.color = lerpedColor;
This works well, but it does require a quad to be created (another draw call per loop), as well as an extra texture (more work & extra complications) – Neither is a big issue, but it’s more complications than I think should be required.
I think the result looks fine, though I suspect it would look much better if I’d removed the text from the base texture – As it is, the base text seems to interfere – giving a slight glow – behind the flashing letters of the quads texture.
5. Shader
The original version of the shader, I checked the colour of the current _MainTex pixel – & changed any which were white. This worked horribly – It seems that before I got to the texture it has been already modified somewhere along the pipeline.

Instead I take a more long-winded approach.
How this works…
Alongside the auto-generated input variables (_Color, _MainTex, _Glossiness & _Metallic – all generated by Unity when creating the shader).
The custom input variables are added;
_Color1 – Used to set the start colour in the loop (white)
_Color2 – Used to set the start colour in the loop (black)
_CutOutTex – From the Quad Cut-Out method, this is a copy of _MainTex, but with everything except the letters (start & goal) removed (transparent instead).

In the surf method, after the colour of the _MainTex is sampled, the equivalent colour from _CutOutTex is identified.
If the alpha values of the sampled _CutOutTex colour is > 0 (not transparent) – Then this is a letter (in the start/goal banner) which needs to be colour shifted – The current colour shift colour is calculated and drawn to the screen.
If the alpha values from the _CutOutTex colour is <= 0 (transparent) – Then this is not part of the banner text and the sample from _MainTex (the default banner texture) is drawn..
Shader "Custom/NewSurfaceShader" {
     Properties {
          _Color ("Color", Color) = (1,1,1,1)
          _MainTex ("Albedo (RGB)", 2D) = "white" {}
          _Glossiness ("Smoothness", Range(0,1)) = 0.5
          _Metallic ("Metallic", Range(0,1)) = 0.0
          _CutOutTex("CutOut", 2D) = "white" { }
          _Color1("Color1", Color) = (1.0, 0.0, 0.0, 1.0)
          _Color2("Color2", Color) = (0.0, 0.0, 1.0, 1.0)
          _Speed("Speed", float) = 0.2
     }

     SubShader {
          Tags { "RenderType"="Opaque" }
          LOD 200

          CGPROGRAM
          // Physically based Standard lighting model, and enable shadows on all light types
          #pragma surface surf Standard fullforwardshadows

          // Use shader model 3.0 target, to get nicer looking lighting
          #pragma target 3.0

          sampler2D _MainTex;

          struct Input {
               float2 uv_MainTex;
          };

          half _Glossiness;
          half _Metallic;
          fixed4 _Color;
          sampler2D _CutOutTex;
          uniform fixed4 _Color1;
          uniform fixed4 _Color2;
          uniform float  _Speed;

          void surf (Input IN, inout SurfaceOutputStandard o) {
          // Albedo comes from a texture tinted by color
          fixed4 c = tex2D (_MainTex, IN.uv_MainTex);
          fixed4 c2 = tex2D(_CutOutTex, IN.uv_MainTex);

          if (c2.a > 0) {
               fixed4 c3 = lerp(_Color1, _Color2, abs(fmod(_Time.a * _Speed, 2.0) - 1.0));

               //if (c.r > 0.99 && c.g > 0.99)
                    c = (c * c3) * _Color;
               }
               else
                    c = c * _Color;

               o.Albedo = c.rgb;
               // Metallic and smoothness come from slider variables
               o.Metallic = _Metallic;
               o.Smoothness = _Glossiness;
               o.Alpha = c.a;
          }
          ENDCG
     }

     FallBack "Diffuse"
}
I haven’t written anything for shaders in a number of years – last time was HLSL for XNA. So the learning curve here was for both figuring out nity & figuring out Unity’s shaders. I’m not particularly happy with the code I’ve put together – I’m very confident there ere are far more succinct ways to achieve the same result – But the the animation looks okay.

6. Texture Sheet Animation.
This is the method I’ve decided to use – It works almost like a traditional animation/flip book – using a series of images, each slightly different from the next – so when they are swapped a speed they appear to show movement.
In this case, the models texture is split into a grid – Each cell of the grid contains a frame of the animation (in this case 8 frames are used).
The model is drawn referencing one cell of the grid\one frame of the animation (UV mapping is explained badly in my last post).
Code (either a Unity script or shader) is used as a timer – to determine when to change to the next frame.

For the code, I referenced Unity3D wiki – Animating Tiled texture
The page offers six code examples – one java/five C#
I had the most success using AnimateTiledTexture & AnimateSpriteSheet classes
Setting with the AnimateTiledTexture code because it was the easiest for me to tweak in order for it to animate the way I needed…
The goal/start texture have frames from white to black – I use ping-pong setup to run backwards and forward through the animation frames – from white to black, then in reverse from black to white – halving the final texture size.
With the code in place I needed to configure the assets – This was much harder to setup than expected – which, for a modern 3D gaming environment was a little disappointing – setting up was more guess work than design – I found it is far easier to setup an animated texture in (the ten year old) XNA.
With first attempt – I made the mistake of using a non-power or two sized texture – This resulted in animated tiles which were blurry, and jitter – jumping around as it forced through each frame – It looked pretty horrible

The image quality improved after resizing the texture to a power of two
and (in the textures Material settings) defining the ‘Tiling’ values to match the frame size
(8 frames in total – 4 columns, 2 rows – Tiling X = 0.25 Y = 0.5 )
This produced a noticeably sharper – non-jittery texture – but displayed a lot of artifacts.

I tried changing the text import settings to advanced; turning off mipmaps, mapping, etc… anything that could be turned off was turnd off – setting the wrap mode to clamp, filter to point – none of which had any effect.
What ultimatly worked for me was setting the texture type to cursor.
I have no idea why cursor settings resolve the issue – or if the next update will break it & put me back to square one.
But for now I have nice, clean, sharp animated start/goals tiles

Next post: 2.6 Pause & Resume
Last post: 2.4 Edge Padding
![]()
For the C64 version of Bounder, the text colour of the start and end tiles bounces between black and white.
I wanted to replicate this in my version – But I wasn’t sure how.
I eventually worked through six potential implementations;
This post covers the first three attempts;
The next post will expand on the final three.
1. Colour Lerp
The most straight forward approach; it uses the built in method color.lerp alongside Mathf.PingPong to bounce colours between black & white – The result is applied to the start/end textures.
How this works…
The Color lerpedColor holds the colour to be displayed.
public Color lerpedColor = Color.white;
Every loop, color.lerp is used to calculate the current colour – Mathf.PingPong ‘animates’ the colour – bouncing it between (in this case) black & white.
lerpedColor = Color.Lerp(Color.white, Color.black, Mathf.PingPong(Time.time, 1));
GetComponent().material.color = lerpedColor;
The end results look great; but unsurprisingly the entire texture changes colour, not just the text.

2. HBSC
Using the HSBColor class, provided in the Unity3D wiki.
The wiki description explains that HSBColor ‘provides a Hue/Saturation/Brightness/Alpha color model in addition to Unity’s built in Red/Green/Blue/Alpha colors. It is useful for interpolating between colors in a more pleasing fashion‘
Rather than following their usage/setup instructions, I instead just stripped the [System.Serializable] tag & used the code like a standard class.
How this works…
Define a global HSBColor object.
public float time = 2.0f;
private HSBColor hsbc;
Which is initialized in the start method.
hsbc = HSBColor.FromColor(color);
Then, every loop the next colour to display is calculated (I think it rotates through six different colours)
hsbc.h = (hsbc.h + Time.deltaTime / time) % 1.0f;
GetComponent().material.color = HSBColor.ToColor(hsbc);
The result may give you a headache;

3. Palette Swap
This reuses the Palette Swap code I wrote for the Spectrum tiles – I really like the effect – (Though I’d need to figure out why some white pixels have turned yellow when being displayed). I’d expected a huge performance hit with this method, but when tested, the game ran at a good pace.
How this works…
Each tile prefab has a material component attached. Each material component has a texture attached. This is the texture used when drawing the tile to screen.
Since the intention is to change the colours of the materials texture, the script keeps a master copy that is unaffected by the paletteSwap code – paletteSwap code uses this master copy as a reference every loop/colour update.
(Rather than using a reference textures; the script could instead, store a copy of the last colour applied and pass that to the paletteSwap code to change every loop – Unfortunately the banner letters lerp between black and white – & the texture has some black pixels in place which may accidently get caught up in the animation).
First the script defines a global texture to be used to hold the master/base texture;
Texture2D paletteSwapTexture;
A copy of this texture is assigned to paletteSwapTexture – (I’m guessing it’s a copy and not a reference, since changing the colours in rend.material.maintexture has no effect on the contents of paletteSwapTexture)
rend = GetComponent();
paletteSwapTexture = (Texture2D) rend.material.mainTexture;
The ‘toColour‘ colour array is defined – This is used to identify which colour in the texture to look for (index 0) & what colour to change it to (index 1).
Color[] toColour = new Color[2] { Color.white, Color.white };
Then, every loop ‘Colour Lerp’ (& Mathf.PingPong) calculates the next colour to display – This is then passed to the PaletteSwap method.
toColour[1] = Color.Lerp(Color.white, Color.black, Mathf.PingPong(Time.time, 1));
Renderer rend = GetComponent();
rend.material.mainTexture = PaletteSwap(toColour, paletteSwapTexture);
Which swaps the colours and returns a new Start/Goal tile texture;
Texture PaletteSwap(Color[] toColours, Texture2D inTexture)
{

     Texture2D source = inTexture;
     Texture2D destination = new Texture2D(source.width, source.height);

     //---

     Color[] pixels = source.GetPixels(0, 0, source.width, source.height);

     int pixelsLength = pixels.Length;
     for (int counter = 0; counter = 0.98 && pixels[counter].g >= 0.99)
          pixels[counter] = toColours[1];

     }

     destination.SetPixels(0, 0, destination.width, destination.height, pixels);
     destination.Apply();

     //---

     return (Texture)destination;

     //---

}
Which ultimatly looks like this – Nice effect, pain in the arse yellow pixels;

Next post: 2.5a Palette Shift
Last post: 2.4 Edge Padding