
Adventures in Unity – 1.6 PickUps
![]()
#1 What would I ideally like to achieve by the time I finish working today – Add objects, floating above platforms which can be collected/picked-up by the player. Objects should be arranged into custom shapes.
#2 What’s the minimum I’d like to achieve by the close of play – Add objects, floating above platforms which can be collected/picked-up by the player.
It seemed a good time to add some pickups – Something like coins in a Mario game.
I had a vague idea of how I wanted the final code to work – Each platform would have X number of pickups above it & I liked the idea of being able to lay the pickups out in the shape of an image – Unfortunately, I had absolutely no idea of how to implement it.
The closest code reference I could think of was from the Unity tutorial Creating a basic platformer. In this 2D game a pickup is created and positioned in one of three locations above a platform (left, right & middle of the platform). The pickup is a prefab (2D sprite) and the three positions are pre-defined transforms (set-up as child objects to the main platform element). When the platform is created, a simple C# script attached to the platform instantiates a pickup referencing one of the transforms (selected at random) for it’s position.

That’s fine and groovy – Unfortunately in my game, platforms are generated with random heights – So I can’t use predefined positions for the pickups – & since the platform scale isn’t determined until after it’s instantiation – I can’t instantiate the pickups when the platform is created.
I played around with a few potential setups – Most of which I could get working after a fashion. However, I wanted to implement this as cleanly as possible, something that at best guess fit in with Unity’s structural practices & would make sense to anyone looking at the project.
This being my first project, I don’t really know how things should be structured – At the moment I’m working from best guesses.
With that in mind I ultimately decided to attach a pickup manager script to the platform prefab. This script would instantiate, manage and ultimate destroy a set of pickups positioned above the platform.
With a script added, I had to deal with the issue of how to instantiate the pickups. As I mentioned previously, a platforms height & position isn’t determined until after it has been created.
Knowing the width (localscale.x) of the platform allows me to identify how many pickups I can create (along the X axis) and stay within the bound of the platform.
Knowing the height (position.y + (scale.y/2)) of the platform allows me to position the pickups at a uniform position above each platform (along the Y axis).
My fudged work around to this, was to create the pickups in the first call of the Update() method rather than in a Start() or Awake() method. It’s not a particularly clean way to manage this issue, but it works without making too much mess.
All subsequent calls to the update();
- Automatically calculates the correct position for each pickup.
- Moves each pickup along the X axis at scroll speed (allowing them to move with the platforms) -also adding a little bounce (by stealing code from an older Xbox 360 project) to give the pickups a little personality.
- It also checks to see if a pickup has moved off-screen – If it has, the pickup is destroyed.
void Update()
{

    //---

    if (GameController.gameState == GameController.GameState.InGame)
    {
        if (pickups != null)
        {

            //---

            baseValueY = gameObject.transform.position.y + (gameObject.transform.localScale.y / 2) + scaleBound;

            float offset = ((sizeX * 1.0f) * scaleBound) / 2;
            baseValueX = gameObject.transform.position.x - offset;

            //---

            for (int ocounter = 0; ocounter < sizeX; ocounter++)
            {

                for (int icounter = 0; icounter < sizeY; icounter++)
                {

                    if (pickups[ocounter, icounter] != null)
                    {

                        //---

                        float bounce = Bounce(pickups[ocounter, icounter].transform.position);
                        pickups[ocounter, icounter].transform.position = new Vector3((baseValueX + (ocounter * scaleBound)), (baseValueY + (icounter * scaleBound) + bounce), 0);

                        if (pickups[ocounter, icounter].transform.position.x <= farLeft)
                            Destroy(pickups[ocounter, icounter]);

                        //---

                    }

                }
            }

            //---

        }
        else if (pickupInit == false)
        {
            PickUpInit();
        }
    }

    //---

}
Now the game automatically positions and manages (create, move, destroy) pickups – I need define a layout. When creating a layout for the pickups I tried two approaches;
The first was to create a rectangular ‘block’ of pickups above each platform.
The ‘PickUpInitBlock()‘ method creates 5 rows of pickups (sizeY = 5;) , each row containing X number of pickups – The number of pickups being determined by the width of the attached platform (sizeX = ((int)gameObject.transform.localScale.x) + 2;)
void PickUpInitBlock()
{

    sizeY = 5;
    sizeX = ((int)gameObject.transform.localScale.x) + 2;

    pickups = new GameObject[sizeX, sizeY];

    for (int ocounter = 0; ocounter < sizeX; ocounter++)
        for (int icounter = 0; icounter < sizeY; icounter++)
        {
            pickups[ocounter, icounter] = Instantiate(pickup, new Vector3(999, 999, 999), Quaternion.identity) as GameObject;
            pickups[ocounter, icounter].transform.Rotate(90, 0, 0);
        }

}
This worked well, but the number of pickups created seemed a little oppressive – Too many pickups and I found the game was less fun to play.
My next attempt/expansion was to try displaying out the pickups in a shape.
The way I implemented this is a bit of a cheat – It effectively uses the same process as in the ‘PickUpInitBlock()‘ method to create a block of pickups – However this time some pickups are turned ‘off’ from the start, allowing a ‘shape’ to be created.
To do this I needed a method of defining and storing shapes which could be quickly referenced at run-time – Something I can reference when instantiating the pickup objects.
With this in mind, I first needed to define/draw some test shapes to work with – To do this I drew a block of ‘.’ characters in an 8×8 square which operated as my blank canvas;
........
........
........
........
........
........
........
........
I then drew/filled in the shape using ‘*’ characters;
..****..
.******.
**.**.**
**.**.**
********
**.**.**
.*....*.
..****..
Finally, merged each line into a string which I could use for storage/retrieval;
..****...******.**.**.****.**.************.**.**.*....*...****..
After creating a few example shapes this way – I added them a string array;
string[] shapes = new string[7]
{
"****************************************************************", //block
"..****...******.**.**.****.**.************.**.**.*....*...****..", //circle
"...**......**.....****..********..****....****...**..**.**....**", //star
"...**.....****...******.********...**......**......**......**...", //arrowup
"....*.......**......***.****************....***.....**......*...", //arrowleft
"...*......**.....***....****************.***......**.......*....", //arrowright
"...**......**......**......**...********.******...****.....**..." //arrowdown
};
Now, when instantiating the pickups, the game creates an 8×8 array of ‘pickup’ objects – randomly selects one of the shapes from the ‘shapes’ array, then loops through the string char-by-char. If the character returned is a ‘*’ it creates a pickup, otherwise it sets the value to null.
Since the Update() method manages the position of each pickup , this method just needs to place them in the correct position in the ‘PickUp’ array;
void PickUpInitShape()
{

    sizeY = GetSize((int)gameObject.transform.localScale.x);
    sizeX = sizeY;

    string shape = GetShape(sizeY);

    //---

    if (shape == "")
        PickUpInitBlock();

    else
    {

        //---

        pickups = new GameObject[sizeX, sizeY];
        int fullSize = (shape.Length - 1);

        for (int ocounter = 0; ocounter < sizeX; ocounter++)
            for (int icounter = 0; icounter < sizeY; icounter++)
            {
                if (shape[fullSize - ((ocounter * sizeY) + icounter)] == '*')
                {
                    pickups[icounter, ocounter] = Instantiate(pickup, new Vector3(999, 999, 999), Quaternion.identity) as GameObject;
                    pickups[icounter, ocounter].transform.Rotate(90, 0, 0);
                }
                else
                    pickups[icounter, ocounter] = null;
            }

        //---

    }

    //---

}
The problem was how to ensure the shapes stayed within the bounds of a randomly sized platform – For a thin platform an 8×8 block of pickups may be too wide.
I only needing a basic implementation that would work for now, but which could potentially expand on at a later date (possibly add more shapes & sizes, set different colours, possibly rotate them around a central point – that kind of thing).
I’m not completely happy with the current implementation, hopefully future amendments will help tighten things up[ quite a lot.
The current fix was to create another sets of shapes – One set defined within an 8×8 block the other within a 5×5 block.
string[] shapes5 = new string[7]
{
"*************************", //block
"..*...***.*****.***...*..", //circle
"*.*.*.***.*****.***.*.*.*", //star
"..*...***.*****..*....*..", //arrowup
"..*....**.*****..**...*..",  //arrowleft
"..*...**..*****.**....*..",  //arrowright
"..*....*..*****.***...*.."  //arrowdown
};
In implementation – The code first checks the platforms scale.x as an int and determines it’s available width.
public int GetSize(int inWidth)
{

    if (inWidth >= 8)
        return 8;

    else if (inWidth >= 5)
        return 5;

    else
        return inWidth;

}
If the platform can accommodate the 8×8 pickups it randomly selects an 8×8 pattern to use – If 8×8 is too large, it checks to see if a 5×5 pattern would suit – If that fails, it reverts back to the original code and creates a block of pickups instead.
void PickUpInitShape()
{

    sizeY = GetSize((int)gameObject.transform.localScale.x);
    sizeX = sizeY;

    string shape = GetShape(sizeY);

    //---

    if (shape == "")
        PickUpInitBlock();

    else
    {

        //---

        pickups = new GameObject[sizeX, sizeY];
        int fullSize = (shape.Length - 1);

        for (int ocounter = 0; ocounter < sizeX; ocounter++)
            for (int icounter = 0; icounter < sizeY; icounter++)
            {
                if (shape[fullSize - ((ocounter * sizeY) + icounter)] == '*')
                {
                    pickups[icounter, ocounter] = Instantiate(pickup, new Vector3(999, 999, 999), Quaternion.identity) as GameObject;
                    pickups[icounter, ocounter].transform.Rotate(90, 0, 0);
                }
                else
                    pickups[icounter, ocounter] = null;
            }

        //---

    }

    //---

}
Now we have pickup objects which can be created, positions, moved and destroyed. However they can’t actually be ‘picked up’.
The pickups themselves are prefabs made up of little more than cylinder objects scaled to a suitable coin-type size.
I set the attached capsule collider to function as a trigger . Attached a simple C# script whose main function is to check and see if the player has collided with the pickup – If a collision has occurred, the pickup is destroyed, a sound effect plays and the score is updated.
void OnTriggerEnter(Collider other)
{
    if (other.gameObject.CompareTag("Player"))
    {
        gameController.AddScorePickupHit();
        Destroy(gameObject);
    }
}
That’s about it.
I did update the jump code again – Modifying the original jump code to allow for double-jumps. I think the game plays better with this code -But I’m not sure how apparent the double jumps are to other players?
Grab a copy of the project here
Next post: 1.7a Highscores (Server Side)
Last post: 1.5 Initial Audio
Father Ted – I Hear You’re A Racist Now, Father!
Adventures in Unity – 1.5 Initial Audio
![]()
#1 What would I ideally like to achieve by the time I finish working today – Add initial audio to the game (in game sound effects & background music) – Update GSM to allow the audio to be turned off/on.
#2 What’s the minimum I’d like to achieve by the close of play – Add initial audio to the game (in game sound effects & background music).
There are two parts to adding audio to the game – one part is adding the audio, the other is adding the option to turn off the audio.
When developing I updated the GSM first, then added the audio – But for the point of explaining what I did, I’ll start with the sound effects first.
Adding Audio:
There are quite a few methods for managing audio in Unity. This being my first attempt I wanted to keep things nice and simple. With that in mind, I currently use five sound files – ‘player jump‘, ‘player land‘, ‘background music‘ and a ‘game over tune‘ for in-game sounds & a ‘button down‘ beep for the GSM.
I attached ‘Player jump‘ and ‘player land‘ to the ‘player‘ Unity object – I added two audio sources components to the ‘player‘ object, plugged in the desired mp3 sounds and made sure ‘play on awake‘ was deselected.
I have a script called ‘player.cs‘ attached to the ‘player‘ object – This is used to manager the player – Read user input, update when jumping, etc. To this I added a couple of global audio source variables, initialising them in the Awake() method;
AudioSource[] sounds = GetComponents();
audioJump = sounds[1];
audioLand = sounds[0];
Then when the player jumps, I play the jump sound effect;
if(isJumping && grounded)
     audioJump.Play();
And I set up a public method, so when the player collides with a platform- When the OnCollisionEnter method associated with the ‘platform‘ object is called, the’ land sound‘ effect is played;
public void PlayHit()
{
     audioLand.Play();
}
‘Background music‘ & ‘game over tune‘ are both handled by the GameController object & associated script.Plugged two audio sources into the GameController object – turned off ‘play on awake‘ but for the background music I turned off ‘loop‘. An attached C# script called GameController which I use primarily to handle the game states was used to manage the audio source’s – Again, like with the player object I created two global variables for each source, I initialised them/plugged them in when Awake() is called. I then created a small method which I invoke to play/stop them as required (at the start of the game and end of the game);
public void InGameMusic(bool doPlay)
{
     if (doPlay)
          audioMusicInGame.Play();
     else
     {
          audioMusicInGame.Stop();
          audioMusicEndGame.Play();
     }
}
That’s pretty much it – I use completely different approach for the button clock sound effect, which I’ll explain in the GSM section below.
Updating the GSM:
When adding sound effects I thought I’d better update the GSM to allow the player to turn the sound on or off as desired.
This turned out to be a much more involved process than I’d anticipated.
I removed the ‘press space to play‘ message from the GSM and replaced them with three UI button objects ‘play‘, ‘sound on/off‘ & ‘FreeSFX website link‘
I grabbed the sound effects from a website called ‘FreeSFX.co.uk‘ – Which provides the sounds free of change so long as they are credited – I added the button since this seemed the easiest way to do so.
For the ‘play‘, ‘sound on/off‘ buttons images, I re-used two pngs I’d created for a number of Android game I developed last year.
‘FreeSFX website link‘ button – I nabbed from the websites twitter page.

When a player clicks on the ‘play‘ button – It references a method in the ‘GameController.cs‘ script setting a bool called ‘clickPlay‘ to true.
public void ClickPlay()
{
     clickPlay = true;
}
In GameController’s update method a check is made to see if the user has pressed/os pressing the space bar, or if ‘clickPlay‘ is true – If either are, it starts the game.
if (Input.GetKeyDown(KeyCode.Space) || clickPlay)
When the user clicks on the ‘sound on/off‘ button – It references a method in the ‘GameController.cs‘ script which switches a bool called ‘clickSound‘ between true & false (play sound, don’t play sound).
public void ClickSound()
{

     //---

     clickSound = !clickSound;

     SetSound();

     //---

}
It then runs a second method called ‘SetSound‘ which, depending on ‘clickSound‘s current value, changes the ‘sound on/off‘ buttons current image & sets the AudioListener‘s volume respectively.
 public void SetSound()
 {

     //---

     if (clickSound)
     {
          buttonSound.image.sprite = soundOnImage;
          AudioListener.volume = 1;
     }
     else
     {
          buttonSound.image.sprite = soundOffImage;
          AudioListener.volume = 0;
     }

     //---

}
When the user clicks on the ‘FreeSFX website link‘ button – It references a method in the ‘GameController.cs‘ script which opens a URL to the freesfx website;
public void ClickFreeSFX()
{
     Application.OpenURL("http://www.freesfx.co.uk/");
}
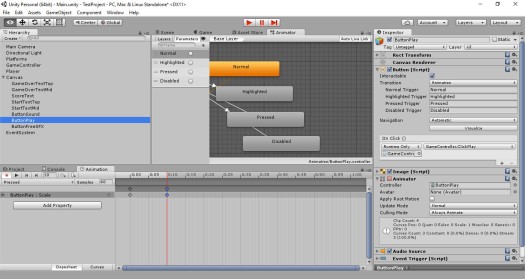
In the original Android app, when the player touched a ‘button‘, I shrank the image a little; giving the impression it was being pushed by the user’s action. I wanted to replicate this when using the buttons in the game. It took a little while for me to work how best to implement feature – Eventually I settled on creating a small animation to perform the action for me.
This was a surprisingly involved process – Adding ‘Animator‘ element to the GUI Button object, selecting the ‘auto generate animation‘ button, saving the generated animation file to the assets folder, ensure the animation for the desired button state doesn’t loop, then opening the animation window, selecting the desired button state & creating an animation using the timeline – So now the buttons shrink a little when selected.
I also wanted to add a sound effect when the button was clicked – This was much harder to work out than I’d have guessed. Ultimately I implemented the feature by, first adding an audio source element to the button, then adding an ‘EventTrigger‘ script – Which plays the sound effect ‘on pointer Down‘

That’s about it – I’ll probably switch sound effects in and out as the game develops – I may try being a little more adventurous with the jump noise – Having a sound play throughout the jump, increasing/decreasing the pitch as the play ascends then descends- We’ll see.
For my next step; I’m not sure – I wanted to build an online highscore table – But so far, everything I’ve found online either requires an account (e.g. google play) or needs a mySQL database (unfortunately I’m too poor to afford that level of hosting).
Maybe I’ll start by adding something for the player to pick up during the game – a secondary objective?
Grab a copy of the project here
Next post: 1.6 PickUps
Last post: 1.4b Tighten & Tidy
Timbuk 3 – The Future’s So Bright
Adventures in Unity – 1.4b Tighten & Tidy
![]()
There were a few sections of code I added during the ‘tighten & Tidy’ process that I thought I’ve cover in a little more detail; Collision detection, jumping & platform generation.
Collision Detection
One of the problems with the code prior to the update, was that a player was able to jump whenever they wanted – whether they were rolling along a platform or already in mid-air. This allowed players to potentially ‘fly’ though the game – even jumping up, safely outside the screen\gamer area.
It seemed more sensible if the player could only jump when they were ‘on’ the platform – A ground level from which they could jump – No jumping in mid-air and no jumping if they fall between platforms.
I cheated a little with the solution – Rather than creating a universal collision detection test, I relied on the idea that platforms implemented used non-rotated/rotating box colliders.
I created a C# script called ‘platform.cs‘ which is attached to the platform prefab.
I check ‘OnCollisionEnter‘ & ‘OnCollisionStay‘ – ‘OnCollisionStay‘ is used for situations where the player-platform collision occurs/registers first against the side of the platform rather than the top.
The collision check itself first confirms that the ‘player‘ component is being tested for collision;
if (collision.gameObject.CompareTag("Player"))
if that is the case, it then checks to see if the collision has occurring against the top of the cube;
if (collision.contacts[0].normal == -(transform.up))
If all these conditions are met, the player component is referenced directly and the players static bool ‘grounded‘ is set to true (allowing jumps to be performed).
Also at this point we check the platforms colour, if it’s set to white (it’s original colour) – We change it to something a little brighter. If the colour is still set, we keep things as they are (to avoid flashing cubes)
& that’s it – Unity’s built in physics engine does the hard work of keeping the objects apart.
void PerformCollisionCheck(Collision collision){

     //Ensure we are checking aginst the player.
     if (collision.gameObject.CompareTag("Player")){

          //---

          //If the top of the cube is being hit
          if (collision.contacts[0].normal == -(transform.up)) {

               //Grab the player
               Player player = collision.gameObject.GetComponent();

               //Set 'grounded' to true (so the player can jump again)
               player.grounded = true;

               Renderer rend = GetComponent();

               //If the cubes colour hasn't already been set
               if (rend.material.GetColor("_Color") == Color.white) {

                    //Change it from white
                    Color whichColour = WhichColour();
                    rend.material.SetColor("_Color", whichColour);
                    rend.material.SetColor("_SpecColor", whichColour);
                    rend.material.SetColor("_EmissionColor", whichColour);
                    rend.material.SetColor("_ReflectColor", whichColour);

                    //Update the players score.
                    gameController.AddScore(GetColor());

               }
          }

     //---

     }

 }
Jumping
The original jump code was taken from the Unity Basic Platform Game tutorial. It’s pretty straight forward, and it does a good job.
‘Update‘ method checks for user input;
if (!GameController.inGame)
     rb.transform.position = new Vector3(0, 11, 0);
else if (grounded && Input.GetButtonDown("Jump")){
     jump = true;
     grounded = false;
}
If so, the ‘FixedUpdate‘ method applies force to the ‘rigidbody‘ – performing the actual ‘jump’;
if (jump)
{
    velocityY = JumpLaunchVelocity * (1.0f - Mathf.Pow(jumpTime / MaxJumpTime, JumpControlPower));

    rb.AddForce(new Vector3(0f, jumpForce, 0f));
    jump = false;
}
This worked well – Certainly well enough that I may reimplement it by the time this game is finished.
The problem is, platforms have random heights & widths – & using a static jump size sometimes made the game feel a little unfair – Some ‘game over’ screens felt undeserved.
Instead I thought I’d try allowing the player to control their jump a little more. The longer the player holds down the jump button – The higher they jump.
This, I hoped, would allow a greater deal of control for the player & making the game a little more skill based & putting the reason for the ‘game over’ back in their court.
I wrote a game for the Xbox 360 a year or two back called Magic Thighs & Slightly Phil – A Bomb Jack clone which implemented this kind jump system.
So, rather than reinvent the wheel, I used a modified (simplified) version of the code for this project.
The updated jump code follows the same structure as the original jump code; the update function checks for user input;
if (GameController.gameState != GameController.GameState.InGame)
    rb.transform.position = new Vector3(0, 11, 0); //Set game init position

else
{

    //---

    isJumping = false;

    if (Input.GetButtonDown("Jump") || Input.GetButton("Jump"))
        isJumping = true;

    //---

}
While the ‘FixedUpdate‘ method applies force to the ‘rigidbody‘
Though the jump code is now a little more complex (though still pretty simple).
With this jump code, we use a timer. When the player initially presses jump, the timer is started.
if ((!wasJumping && grounded) || jumpTime > 0.0f)
{
     jumpTime += Time.deltaTime;
 }
While the timer is running we apply force to the player objects ‘rigidbody‘
velocityY = JumpLaunchVelocity * (1.0f - Mathf.Pow(jumpTime / MaxJumpTime, JumpControlPower));

rb.AddForce(new Vector3(0f, velocityY, 0f));
Once the timer reaches a predefined ‘MaxJumpTime‘ or the player releases the jump button, we stop applying velocity to the ‘rigidbody‘ and don’t allow the player to try jumping again until he hits the ground/platform top
if (isJumping)
{

    if ((!wasJumping && grounded) || jumpTime > 0.0f)
    {
        jumpTime += Time.deltaTime;
    }

    // If we are in the ascent of the jump
    if (0.0f < jumpTime && jumpTime  jumpForce)
        {
            velocityY = jumpForce;
        }

        rb.AddForce(new Vector3(0f, velocityY, 0f));

    }

    else // Reached the apex of the jump
    {
        jumpTime = 0.0f;
    }

}

else // Continues not jumping or cancels a jump in progress
{
    jumpTime = 0.0f;
}

wasJumping = isJumping;
It’s not perfect, but, for now at least, it does the job.
Platform Generation
I’m intending to play around with platform a little before this game is complete, so for the moment I’ve kept things pretty simple.
The idea is I need each platform to be a different height – Not so different that the player cant jump onto it – But not so similar that the game doesn’t present a challenge.
I populate the level with platforms (from left to right) – Using a ‘farLeft‘/’farRight‘ variables to determine desired start and end ‘X‘ positions.
Every game loop I scroll the platforms left a little – Removing the platforms whose ‘X‘ position is < 'farLeft‘ – Adding platforms until the ‘X‘ position of right most platform reaches (or exceeds) ‘farRight‘.
private void PopulatePlatforms()
{

    float posX = farLeft;
    if (platforms.Count <= 0)
        initalPlatform();

    //---

    //Find the X psition of the last platform in the list (furthest right)
    posX = (platforms[platforms.Count - 1].transform.position.x + (platforms[platforms.Count - 1].transform.localScale.x / 2)) + 1;

    //If we don't have enough platofrms to fill the screen - we need to add some
    while (posX < farRight)
    {

        float width = Random.Range(widthMin, widthMax); //randomise platform width
        float height = NextHeight(); //Find platforms height

        posX += width / 2; //Find the relevent X pos for the new platform.

        //Combine and define the final position
        Vector3 position = new Vector3(posX, basePosition + (height / 2), 0);

        //Combine and define the final scale
        Vector3 scale = new Vector3(width, height, 10);

        //---

        //Add the platform
        platforms.Add(Instantiate(platform, position, Quaternion.identity) as GameObject);
        platforms[platforms.Count - 1].transform.position = position;
        platforms[platforms.Count - 1].transform.localScale = scale;

        //Update the X pos so the while loop to chack (+1 to add a space between platforms)
        posX += (width / 2) + 1;

    };

}
When adding a new platform I randomise the platforms width (within a range) – Use the ‘NextHeight‘ method to determine it’s height.
‘NextHeight‘ initaly sets the height of the new platform to match that of the last platform.
It them applies a random value to the height (within a range). This range is between -‘heightRangeMax‘ and +’heightRangeMax‘
height = lastHeight + Random.Range(-heightRangeMax, heightRangeMax);
‘heightRangeMax‘ represents the largest difference in height between platforms that a player can still be expected to jump up to.
(Note: The minimum range could really be any height, since falling isn’t a problem, for for now this seems more succinct).
After generating the platforms height, which we ensure the platform stays within the acceptable maximum and minimum height for the play area/screen.
        if (height > heightMax)
            height = heightMax;
        else if (height < heightMin)
            height = heightMin;
We make sure to the difference in height between the last platform and the new platform is suitably large.
while (Mathf.Abs(height - lastHeight) <= heightRangeMin)
& If everything looks good, we update the ‘lastHeight‘ variable with this platforms height and return to ‘PopulatePlatforms‘.
float NextHeight()
{

    float height = 0;

    do
    {

        //Randomise a height for the new platform
        height = lastHeight + Random.Range(-heightRangeMax, heightRangeMax);

        //Ensure the height isn't too large or too small
        if (height > heightMax)
            height = heightMax;
        else if (height < heightMin)
            height = heightMin;

    } while (Mathf.Abs(height - lastHeight) <= heightRangeMin); //Check the height difference is at least equal to the minimum acceptable size difference.

    lastHeight = height; //Save height to last height so the next platform has something to measure against.

    return height;
}
There;s lots more to tweaks with this code still to go – The player jump feels a little sluggish & the size difference between platforms is still a little small.
But I can tweak these as things go on.
Next I’m going to try to add a little audio to the game.
(I’ve absolutely been relying far too much on the ‘energetic‘ tune from Microsoft’s ‘MovieMoments‘ app to keep things sounding interesting).
Grab a copy of the project here
Next post: 1.5 Initial Audio
Last post: 1.4a Tighten & Tidy
Vic and Bob – Masterchef
Adventures in Unity – 1.4a Tighten & Tidy
![]()
This probably isn’t the most professional approach to development.
But what I tend to do, every so often, is to stop expanding the game (adding new functionality & features) and spend a little time refining what I have – Both in how the game works & looks, and in how the code is structured.
Note: I only really do this on games – such as this one – where I’ve started with no specific goal, endpoint or design in place – Just a general idea of what I’m trying to put together.
By refining I mean;
- Making changes which don’t require much (or any) code amendment, but do take a little time to refine (e.g. trying out different fonts for the GSM font or changing game scroll speed).
- Making small refinements to existing code which has a large impact overall (e.g. Making the players score based on a timer instead of a frame count).
- Tidying the code a little – removing anything that’s no longer required, updating whatever remains.
This allows me to keep control of the code as functionality expands and ideas/implementations change and are refined.
It also helps me try out new ideas – which I can test out and tighten as development continues – even remove altogether if I decide I’m going down the wrong path.
Reorganised GSM UI – Used tank font & expanded GSM text
Added materials (textures) to platforms and player (gem & rock) – Trying out new looks.
Removed materials – None of the new looks seemed to work.
Updated collision – Platforms are just Unity cubes; Checking that the player has hit the top face allows;
Player can now only jump when on the ground – removing the Flappy Bird style controls.
Change platform colour on collision – Trying keep things visually interesting without using materials/textures.
Added platform collision count – Whenever the player lands on a platform (hits the top face of the platform – a point is added – Currently used to increase scroll speed.
Changed score to display a timer & the platform collision count – Not the final score set-up; trying to figure out what info I need to see.
Changed camera position & rotation – Ensures the players block position is always clear.
Locked players Z position – To stop the player cube from bouncing off into the distance.
Tightened off screen check – It took too long, after the player moved out of play for the game over screen to show.
Updated controls – Space or mouse click are used to control the player and start new games.
Updated controls – The longer the space bar/mouse button is held down, the higher the player jumps. Using a modified version of the jump code from Magic Thighs & Slightly Phil.
Ensured platforms vary in height – Platforms are now guaranteed to be different heights (but not so different that the player cant jump between them).
Game increases in speed over time – Increasing game difficulty the better it’s played.
This isn’t supposed to represent the code in it’s final form – But it helps me keep a handle on the state of all aspects of the project.
There are still plenty of issues with the code as is (for example there are lots of times when the game starts the player falls directly between platforms), and lots of features that I need to add – Hopefully after tidying and tightening the code, I’m in a better position moving forward.
Grab a copy of the project here
Next post: 1.4b Tighten & Tidy
Last post: 1.3 Initial GSM
