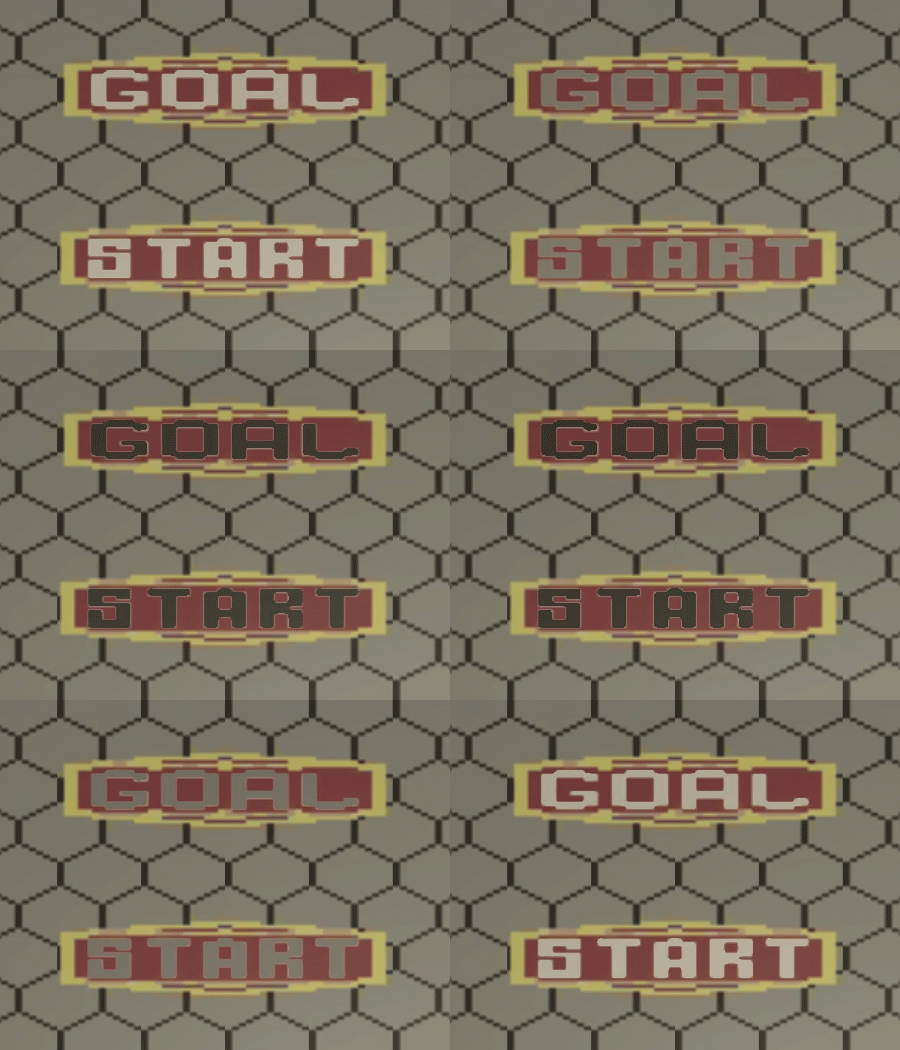
For the C64 version of Bounder, the text colour of the start and end tiles bounces between black and white.


I wanted to replicate this in my version – But I wasn’t sure how.
I eventually worked through six potential implementations;
- Colour Lerp.
- HBSC
- Palette Swap
- Quad Cut-Out
- Shader
- Texture Sheet Animation.
The first three implementations, were covered in the last post.
- Colour Lerp.
- HBSC
- Palette Swap
This post will expand on the second half;
- Quad Cut-Out
- Shader
- Texture Sheet Animation.
4. Quad Cut-Out
This method uses two textures – One ‘base’ texture displays the standard start/goal tile texture – The other ‘top’ texture; is a copy of the top face of the tile texture; the face showing the start/goal banner image & text – with everything except the letters (start & goal) removed (transparent instead).

Right image shows the quad texture for the same tile.
The base texture is used to draw the tile model. The top texture is applied to a quad – a child of the tile – which is positioned just over the top of the base tile.
The colour lerp code is then applied to the the top texture – ensuring only the text changes colour while the background remains the same.
How this works…
First a quad (this will be created locally) and a material holding the quads texture (this will be passed as a reference in the Unity editor) are defined as global variables;
GameObject quad;
public Material material1;
In start, the quad is created & configured.
if (type == Type.Enter || type == Type.Exit)
{

     quad = GameObject.CreatePrimitive(PrimitiveType.Quad);
     rend = quad.GetComponent();
     rend.material = material1;
     quad.transform.parent = transform;

      quad.transform.Rotate(90, 0, 0);

}
Since this method uses the colour lerp code, we need somewhere to hold the current colour.
public Color lerpedColor = Color.white;
Then every loop, the position of the quad is updated (to keep up with the tile as it scrolls down the screen). The next colour for the banner flash is calculated and assigned to the quads texture.
quad.transform.position = new Vector3(transform.position.x, transform.position.y + 0.275f, transform.position.z);
lerpedColor = Color.Lerp(Color.white, Color.black, Mathf.PingPong(Time.time, 1));
quad.GetComponent().material.color = lerpedColor;
This works well, but it does require a quad to be created (another draw call per loop), as well as an extra texture (more work & extra complications) – Neither is a big issue, but it’s more complications than I think should be required.
I think the result looks fine, though I suspect it would look much better if I’d removed the text from the base texture – As it is, the base text seems to interfere – giving a slight glow – behind the flashing letters of the quads texture.

5. Shader
The original version of the shader, I checked the colour of the current _MainTex pixel – & changed any which were white. This worked horribly – It seems that before I got to the texture it has been already modified somewhere along the pipeline.

Instead I take a more long-winded approach.
How this works…
Alongside the auto-generated input variables (_Color, _MainTex, _Glossiness & _Metallic – all generated by Unity when creating the shader).
The custom input variables are added;
_Color1 – Used to set the start colour in the loop (white)
_Color2 – Used to set the start colour in the loop (black)
_CutOutTex – From the Quad Cut-Out method, this is a copy of _MainTex, but with everything except the letters (start & goal) removed (transparent instead).

Right side shows _CutOutTex
In the surf method, after the colour of the _MainTex is sampled, the equivalent colour from _CutOutTex is identified.
If the alpha values of the sampled _CutOutTex colour is > 0 (not transparent) – Then this is a letter (in the start/goal banner) which needs to be colour shifted – The current colour shift colour is calculated and drawn to the screen.
If the alpha values from the _CutOutTex colour is <= 0 (transparent) – Then this is not part of the banner text and the sample from _MainTex (the default banner texture) is drawn..
Shader "Custom/NewSurfaceShader" {
     Properties {
          _Color ("Color", Color) = (1,1,1,1)
          _MainTex ("Albedo (RGB)", 2D) = "white" {}
          _Glossiness ("Smoothness", Range(0,1)) = 0.5
          _Metallic ("Metallic", Range(0,1)) = 0.0
          _CutOutTex("CutOut", 2D) = "white" { }
          _Color1("Color1", Color) = (1.0, 0.0, 0.0, 1.0)
          _Color2("Color2", Color) = (0.0, 0.0, 1.0, 1.0)
          _Speed("Speed", float) = 0.2
     }

     SubShader {
          Tags { "RenderType"="Opaque" }
          LOD 200

          CGPROGRAM
          // Physically based Standard lighting model, and enable shadows on all light types
          #pragma surface surf Standard fullforwardshadows

          // Use shader model 3.0 target, to get nicer looking lighting
          #pragma target 3.0

          sampler2D _MainTex;

          struct Input {
               float2 uv_MainTex;
          };

          half _Glossiness;
          half _Metallic;
          fixed4 _Color;
          sampler2D _CutOutTex;
          uniform fixed4 _Color1;
          uniform fixed4 _Color2;
          uniform float  _Speed;

          void surf (Input IN, inout SurfaceOutputStandard o) {
          // Albedo comes from a texture tinted by color
          fixed4 c = tex2D (_MainTex, IN.uv_MainTex);
          fixed4 c2 = tex2D(_CutOutTex, IN.uv_MainTex);

          if (c2.a > 0) {
               fixed4 c3 = lerp(_Color1, _Color2, abs(fmod(_Time.a * _Speed, 2.0) - 1.0));

               //if (c.r > 0.99 && c.g > 0.99)
                    c = (c * c3) * _Color;
               }
               else
                    c = c * _Color;

               o.Albedo = c.rgb;
               // Metallic and smoothness come from slider variables
               o.Metallic = _Metallic;
               o.Smoothness = _Glossiness;
               o.Alpha = c.a;
          }
          ENDCG
     }

     FallBack "Diffuse"
}
I haven’t written anything for shaders in a number of years – last time was HLSL for XNA. So the learning curve here was for both figuring out nity & figuring out Unity’s shaders. I’m not particularly happy with the code I’ve put together – I’m very confident there ere are far more succinct ways to achieve the same result – But the the animation looks okay.

6. Texture Sheet Animation.
This is the method I’ve decided to use – It works almost like a traditional animation/flip book – using a series of images, each slightly different from the next – so when they are swapped a speed they appear to show movement.
In this case, the models texture is split into a grid – Each cell of the grid contains a frame of the animation (in this case 8 frames are used).
The model is drawn referencing one cell of the grid\one frame of the animation (UV mapping is explained badly in my last post).
Code (either a Unity script or shader) is used as a timer – to determine when to change to the next frame.

For the code, I referenced Unity3D wiki – Animating Tiled texture
The page offers six code examples – one java/five C#
I had the most success using AnimateTiledTexture & AnimateSpriteSheet classes
Setting with the AnimateTiledTexture code because it was the easiest for me to tweak in order for it to animate the way I needed…
The goal/start texture have frames from white to black – I use ping-pong setup to run backwards and forward through the animation frames – from white to black, then in reverse from black to white – halving the final texture size.
With the code in place I needed to configure the assets – This was much harder to setup than expected – which, for a modern 3D gaming environment was a little disappointing – setting up was more guess work than design – I found it is far easier to setup an animated texture in (the ten year old) XNA.
With first attempt – I made the mistake of using a non-power or two sized texture – This resulted in animated tiles which were blurry, and jitter – jumping around as it forced through each frame – It looked pretty horrible

The image quality improved after resizing the texture to a power of two
and (in the textures Material settings) defining the ‘Tiling’ values to match the frame size
(8 frames in total – 4 columns, 2 rows – Tiling X = 0.25 Y = 0.5 )
This produced a noticeably sharper – non-jittery texture – but displayed a lot of artifacts.

I tried changing the text import settings to advanced; turning off mipmaps, mapping, etc… anything that could be turned off was turnd off – setting the wrap mode to clamp, filter to point – none of which had any effect.
What ultimatly worked for me was setting the texture type to cursor.
I have no idea why cursor settings resolve the issue – or if the next update will break it & put me back to square one.
But for now I have nice, clean, sharp animated start/goals tiles

Next post: 2.6 Pause & Resume
Last post: 2.4 Edge Padding


